Tutorial5: Introducing
Server-Side Javascript API
Adding
a new Item to the To Do List
Changing
the priority of an Item
Add
some styling for completed items
Add
some sorting to the function
Deleting
an item from the To Do List
See also: Tutorials Index, Javascript Developer’s Guide, API Javadoc, Javascript Editor, Javascript Quick Reference Card (printable)
Introduction
In this tutorial we will guide you through the first steps of writing script code using the Verj.io Server-Side API.
This tutorial will step you through writing Javascript scripts which will complete the supplied To Do List application.
We assume that you have some familiarity with using the Verj.io Studio and general Verj.io concepts such as forms,
events, scripts, tables, fields, resources, etc. If not, you are recommended to start with the tutorial Building your First Form.
The Server-Side API is an object-oriented API which provides access to Verj.io items such as fields, controls, tables, pages, resources and forms.
We will show you how to program with some of the objects in the API and how the API is used to achieve some of the most common
web application tasks. We will also introduce some of the
key concepts behind the API and using the Javascript
script editor.
To do this we will complete a small application for
maintaining a To Do List. It will support the following functions:
- Adding
an item to the To Do List
- Prioritizing
Items on the To Do List
- Completing
an item on the To Do List
- Removing
items from the To Do List
This To Do List application is supplied
with Verj.io and has to be imported before you can
start this tutorial. The application is complete apart
from the scripts being empty. This tutorial will step you through completing these scripts to provide the required functionality.
Importing the base forms
This To Do List application will make use of the to_do_list database table, which is included in the EBASE_SAMPLES database1,
and an export file of exported entities containing two forms and associated scripts and resources which must be imported before you commence the tutorial.
Import the export file as follows:
- If the Tutorials project
doesn’t already exist, create it by right clicking in the tree panel and
selecting New > Project.
- Right click on the Tutorials project
and select Import > Workspace Archive and import file Studio\samples\to_do_list\tutorial5.zip
from the Verj.io Studio
installation accepting all the defaults. This will create a Tutorial5 folder in the project
containing the imported entities.
1 The database table already exists in the database EBASE_SAMPLES provided with Verj.io. If you need to create the EBASE_SAMPLES database
yourself
scripts can be found in folder Server/databaseSchemas of the server installation.
Set the form presentation template (if not already set)
Open the form ToDoList, click form
properties from the toolbar, click on Presentation
tab, select presentation template xiDefault.
Repeat the same for the form ToDoListConfirmDelete.
The first
script
As mentioned above the API is object-oriented. We are not going to go into detail describing object-oriented language theory, but will give enough (very simplistic) information here to hopefully enable those not familiar with it to make sense of the code we are going to write.
In simple terms objects represent a logical entity, for example a car, and objects contain attributes relating to that entity (e.g. the car’s engine capacity) and methods that manipulate those attributes and enable the object to relate to other objects (for example a setEngineCapacity() method for the car):
// Example code creating two new instances of the objects car and person, in Javascript:
var
mycar = new Car();
var
me = new Person();
// Set object data using object methods:
mycar.setEngineCapacity(2000);
mycar.setRegNumber("EBA 123");
mycar.setModelName("
me.setName("John");
me.setDateOfBirth("1980-09-13");
// Objects can refer to other objects, in this example the car can refer to its owner as the object “me”:
mycar.setOwner(me);
var ownerOfTheCar = mycar.getOwner();
Introducing the
built-in Verj.io objects and code-assist
Once you have imported the required forms, scripts, etc, you are ready to open your first script and start coding with the API. In the Tutorial5 folder there is a Scripts folder with 9 scripts in it.
Double click the init script to open it. You will see that it contains just two lines:
importPackage(com.ebasetech.xi.api);
importPackage(com.ebasetech.xi.services);
These lines are there to help us organise and access objects more easily; for the moment do not worry if you do not understand these two statements. Just remember that all the scripts in this tutorial will require that you have these two lines at the top of each script.
How to launch code assist
Below these two lines, place your cursor at the beginning of a new line in the editor and hold down the Ctrl key on your keyboard and then, while continuing to hold down the Ctrl key, press the Space bar. You should see two boxes appear in the editor window, on the left is a list of items and the one on the right has a shaded background and some help text that relates to the selected item on the left. If you press the up and down arrow keys on your keyboard you can change the selected item on the left hand side, and the help text changes as you alter the selected item.
Those items that have an inverted blue triangle![]() next
to them represent API objects. The list contains objects such as fields,
form, pages and tables.
next
to them represent API objects. The list contains objects such as fields,
form, pages and tables.
For example the fields object will allow you to work with form fields, the tables object to manipulate tables of your form, etc. This list, once visible, will remain and its contents will reduce as you type into the editor.
How to get full list
of objects with code assist
For example if you start at a new line in the editor, press Ctrl and Space together to bring up the code-assist you get a full list of objects, then type in the letter “f” and you will see the contents of the list reduce to just include the forms and fields objects (among other things beginning with “f”).
Insert table object
using code assist
Starting on a clear line press Ctrl and Space and then type “t”, the list will contain the object tables at the top which is highlighted.
Pressing the return key will select this object and insert it into your script.
Access properties and
methods of the tables object
To access properties and methods of the tables object we can type the period (full stop) character, if you do this you should see the two boxes appear again.
The top items in the left hand list are a list of all the tables specified in the form ToDoList (each script is linked to a particular form as specified at the top of the editor where it says “Using Form: my_form_name change”, this is set automatically by the system but can be changed by clicking on the change link).
The ToDoList form only has one table called TO_DO_LIST. Select this in the left hand box and press the Return key on your keyboard (as you did previously).
You should now have the text tables.TO_DO_LIST in your editor. Press the period (full stop) key
again and once again you will see the two boxes, the left hand side one with a
list of options relevant to the table TO_DO_LIST. The top items in
the list are the columns that belong to this table (CREATED_DATE, PRIORITY, etc).
We are interested in the fetchTable() method, so type in the letter “f” and you will see the options on the left hand side reduce to all those beginning with “f”.
We want the first option which should already be highlighted, so just press return and the fetchTable() code is added to your line.
To finish off, type in a semi-colon “;”.
You should now have this completed line of code snippet in init script:
// Fetch the data from
the database
tables.TO_DO_LIST.fetchTable();
The init script is configured on the ToDoList Form’s Before Form event and runs when you run the form for the first time.
The purpose of this script is to load (“fetch”) the list’s data from the database.
Save script and run
the form
Save your script and then run the ToDoList form in the Forms folder. The script should run and fetch some test data into your table and display it.
Adding a new Item to the To Do List
Creating Javascript variables
Now we are going to edit the addNew
script so we can add new items to our To Do List. This script is
attached to the “Add new item” button (BUTTON1) at the top of the page and runs
when the button is clicked. It will take the user entered data from the form
fields NEW_ITEM_TITLE and NEW_ITEM_PRIORITY and
insert a new To Do item into the database.
To make our code a little clearer to read we will get
the field data and hold it in a Javascript variable. Javascript
variables are declared in your script with the var keyword.
Accessing field values from script uses the
fields object (as we did with the tables object above) and then
specifying the value property.
In addNew script enter the following lines of code using the code-assist
feature to help you:
// Create local variables from Form fields values
var newtitle = fields.NEW_ITEM_TITLE.value;
var newpriority =
fields.NEW_ITEM_PRIORITY.value;
We now have two local Javascript
variables called newtitle and newpriority which contain the values of the form
fields.
Inserting new table row with values
The
following code will insert a new row into the table; it is very similar to the “fetchtable” code above, only this time we will use
the method
insertRow().
Again use
the code-assist
feature to help you enter the code into the script:
// Add a new row to the To Do List
tables.TO_DO_LIST.insertRow();
We now have
a new row in the table so we want to set the four table column values. We do
this by accessing the table columns via the tables object and setting
the value property with this code:
//Set the table column values
tables.TO_DO_LIST.TITLE.value = newtitle;
tables.TO_DO_LIST.PRIORITY.value = newpriority;
N.B.: We are using the Javascript
variables we declared previously. We could just as easily use the form
field value directly like so:
tables.TO_DO_LIST.TITLE.value = fields.NEW_ITEM_TITLE.value;
We are
going to set values for the other two columns, the first of which is the
current date and time: the CREATED_DATE table column is of type
DateTime which accepts a Javascript
date as a valid input. Enter the following text into the script:
//Set the table column values
tables.TO_DO_LIST.CREATED_DATE.value = new Date();
The STATE
table column can have either “1” or “2” as a value, “1” means the task is yet to be
completed, “2” means the task has
been completed.
All new
tasks will be set to “1”. Add the following code to your script:
//Set the table column values
tables.TO_DO_LIST.STATE.value = 1;
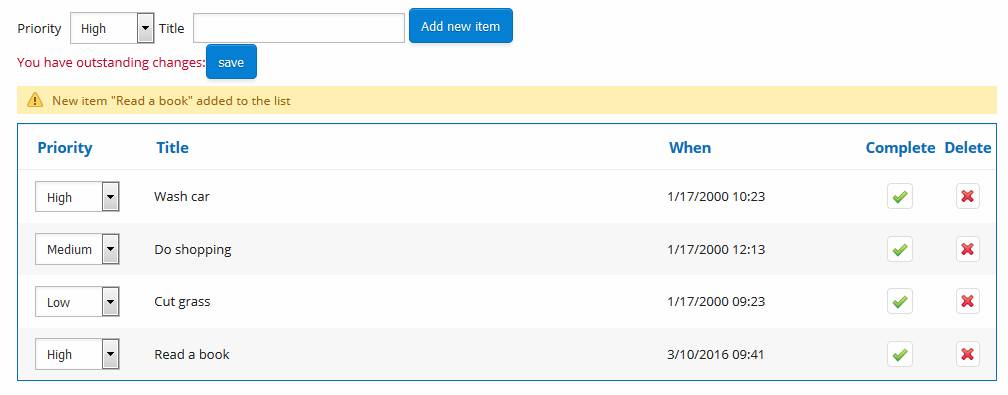
Adding a message
After the
new item is added to the list it will be visible at the bottom of the table on
the page. As an extra indication that a new task was added we are going to display
a message on the page. To
display messages we can use a Message Control. Controls are
accessed in the same way as tables and fields, via the API using the controls object. The Message Control MESSAGE1
has the method addWarningMessage().
Use the code-assist to enter this code:
//Add msg
var msg = "New item
\"" + fields.NEW_ITEM_TITLE.value +
"\" added to the list";
//Show message to user
controls.MESSAGE1.addWarningMessage(msg);
N.B: This could be extended to show an error
message if the new item wasn’t added successfully for some reason.
Reset fields
To keep things
nice and tidy we will reset the two input fields so they are empty with the
following code:
//reset fields
fields.NEW_ITEM_TITLE.value = null;
fields.NEW_ITEM_PRIORITY.value = 1; // The default Priority, High
Save the addNew script, we will return to it soon
to complete the code.
Saving Changes to the To Do List
The only
thing remaining to do now with the addNew
script is to save the new item to the database for future display. We
could do this with a simple updateTable()
method call on the TO_DO_LIST table
object. However, this application is going to be saving other changes made
by our user to the database such as completing tasks, deleting tasks and
changing priorities, so it makes sense for us to centralize this process. This
has the benefit of making the code easier to understand and maintain. We have
decided to implement a “save” button, so any changes made
to the data will result in a save button being displayed.
This button
when clicked will save the changed data to the database and then hide the save
button again.
Define a shared function
To
centralize this functionality we are going to use a shared function script.
These are normal Javascript scripts that are added to
the Form in the Form Properties > Events section.
Any code in
the scripts specified here is available to all other scripts on the form. Our script specified in the Shared
Functions section is called sharedToDoListFunction.
It is
called this because it is going to contain some Javascript
functions which we can call from other scripts (such as the addNew script we are just about to
complete).
To define a
function in Javascript open the sharedToDoListFunctions script and enter the following
code:
function showSavePanel()
{
controls.PANEL4.show();
}
Call the shared function
showSavePanel()
The function is called showSavePanel() and it contains one line of code which makes a Panel Control visible (this panel contains our save button).
Save this script then return to the addNew script you have been editing previously.
Place your cursor on a new line at the bottom of this script.
Press the Ctrl
and Space keys together to bring
up the code-assist and your new function from the library script
should now appear on the list to make it simple to enter the following code:
showSavePanel();
This will
call the showSavePanel()
function which we just defined in our Library Script.
Save the addNew script.
Run the TO_DO_LIST form
Run the form again and try to add a
new item to the list, you should see the item added to the bottom of
the list, a message confirming the addition and a save button being shown
prompting you to save the changes. This
save functionality has yet to be implemented, so if you run the form again you
will see that the new item has not been stored in the database (and so is
missing when the fetchtable()
method is run on start up).
------------------------------------------------------------------------------------------------------------------
Changing the priority of an Item – On Change event
Each item on the To Do list has a drop-down field showing the priority of the item (High, Medium or Low).
If we change this drop-down value we also want the save button to appear to flag that a change has been made and needs saving to the database.
The script changePriority is attached to the On Change event of the field (it is set to use Immediate Validation so when the drop-down’s value is changed the script runs straight away) and only contains one line, a line that calls the function we have just defined in our Library Script.
Open this script changePriority and add this line, don’t forget that the function should be available in the code-assist list:
showSavePanel();
Save the script.
Changing the state of an Item
To set an item as Completed (i.e. state is 2), the user clicks on a green tick image and this is implemented using a Table Image Column. Clicking this image runs the completeToDo script, which needs to set the new value for the state and then show the save button.
Add the following code to the script completeToDo and save it:
// Change the state
value
tables.TO_DO_LIST.STATE.value = 2;
// Alert for unsaved
changes
showSavePanel();
Saving the table
The save button is shown whenever a change is made to the data in our table. Saving the data is done when this save button is clicked and is very simple: the saveToDo script needs to call the updateTable() method on the TO_DO_LIST table.
Open this script saveToDo and add the following code:
// Save the To Do list
tables.TO_DO_LIST.updateTable();
And then we want to hide the save prompt, don’t forget to use the code-assist feature to help you enter the code quickly and efficiently:
// Hide the save alert
controls.PANEL4.hide();
Save the script, you should now be able to run the TO_DO_LIST form, add new items, change their status and priority and have these saved to the database.
Have a play changing and saving the data in the table. Just to be sure the data has been saved to the database run the form again and you should see any new or edited data.
You will also see that it is impossible to tell which tasks have been completed and those which haven’t, so let’s remedy that now.
Add some styling for completed items
Styling controls at
runtime
When we complete a task wouldn’t it be nice to have the text struck out by a big line through the middle? Some satisfaction for a job well done! We can do this by adding some styling to the TITLE table column when we click the green tick icon.
This will mean adding some code to the completeToDo script. As usual using the code-assist will make life easier typing in this line of code at the end of the script:
// Add styling for
completed task
controls.FIELDCOLUMN4.editorInputTextProperties.textDecoration
= "line-through";
Notice we are using the controls object which gives us access to all the controls on the form.
To style the text in control
FIELDCOLUMN4,
we are setting the textDecoration property of editorInputTextProperties to the value line-through.
Looping through the To Do List to
add styling
If you run the form and set a task to be completed you will see a nice struck through text, fantastic! However, run the form again and your styling will be lost. Boo!
This is because the reload of the table when the form starts will have forgotten any styling added previously. To make sure we always have completed tasks struck out, we are going to have to add styling each time we display the table. As this is a task we might want to do more than once from different scripts, it makes sense to write a function and add it to the sharedToDoListFunctions script.
Let’s call the new function refreshToDoList() and get it to check each row in the table and style the ones that have been completed.
Looping through a table is a little more complicated than the code examples up to now. To do this we need a TableRowIterator object.
One of these objects gives us the ability to loop through every row in a table, and this is achieved using a while loop - this loop checks there is another row in the table and moves its pointer to reference that row; when there are no more rows, the loop finishes.
Script sharedToDoListFunctions enter the following code using the code-assist to help you:
function refreshToDoList()
{
// Get a
TableRowIterator object for the TO_DO_LIST table
var rows = tables.TO_DO_LIST.getRows();
//
Loop through the rows using a while statement and the rows.next()
method
while (rows.next())
{
//
Clear any styling
controls.FIELDCOLUMN4.editorInputTextProperties.textDecoration
= "none";
//
Add required styling
if (tables.TO_DO_LIST.STATE.value
== 2)
{
controls.FIELDCOLUMN4.editorInputTextProperties.textDecoration = "line-through";
}
}
}
Here we can
see that we are firstly setting the style for each row to have no
text decoration, and then using an “if” statement to check the value of
the STATE
table column.
If that value
is “2” (completed) then we set the style to be struck through (note the
use of “==” as the comparator).
Save the script and then open the init
script and add the function call at the bottom of the script:
refreshToDoList();
Repeat this for the saveToDo
script as well and then save it.
Now run
the form again and you should see all items that have been completed
struck through!
Add some sorting to the function
I know what you are thinking, this To Do List is great but the items are over the place in the list. It would be great if we could have the completed tasks put neatly out the way at the bottom
and have the tasks ordered by priority so the most important are at the top of the list. Fortunately this is simple!
Let’s enhance the refreshToDoList() function to sort our table as well as style it. Sorting tables is easy to do using a sort() method on the TO_DO_LIST table. There is more than one sort() method to choose from: the simplest form is to pass in a TableColumn object of the column you want to order the table by, like this:
tables.TO_DO_LIST.sort(tables.TO_DO_LIST.PRIORITY);
Note how we passing in a TableColumn
object to the sort method.
If we used
this code we would have the Highs at the top and the Lows at the bottom (and of
course the Mediums in the middle), but the completed and incomplete tasks would
be all mixed up.
To get
around this we need to sort by two columns instead of just one, first the STATE
column and then the PRIORITY. This will first separate out the complete and
incomplete tasks, then sort by the Priority, putting the high ones at the
top. To pass in more than one TableColumn object, we use an array (a
collection of objects signified by the square brackets).
Enter the text below into the end of the refreshToDoList() function, just after the table while looping section (making sure it is in the function’s main brackets, not outside):
// Sort by State and then by Priority
tables.TO_DO_LIST.sort( [tables.TO_DO_LIST.STATE,
tables.TO_DO_LIST.PRIORITY] );
Save the script and run the form and you will
see all the completed tasks together at the bottom, and all
tasks order by priority. Super!
Make some
changes and save, you should see the table being ordered with the new data.
Deleting an item from the To Do List
One last thing remains to be done: enable the ability to remove items from the list completely. As deleting an item is pretty serious stuff, we want to get some confirmation from the user that this is really what they want to do. We are going to display a message to the user and they have to select OK to confirm, or Cancel to change their decision.
We are going to implement this by calling another form; calling a form in this way is a common requirement with Verj.io.
The delete column of the table has a script attached called deleteToDo, this script will call a form called ToDoListConfirmDelete which displays the message to the user.
After the user clicks OK or Cancel, we return the user’s response to the calling form which then continues processing the deleteToDo script. Depending on the user’s response, the task will be deleted from the table and the save button displayed. To make this clear to the user, we will give them some feedback: we will send the title of the task to be deleted into the ToDoListConfirmDelete form. We can then display it as part of the confirmation message to the user.
We pass values into the called form by creating an Javascript Object that contains name value pairs. In Javascript we can create this object with the {} syntax, for example:
var myNameValueList =
{};
And setting
new name value pairs is done as in this example:
myNameValueList.name = "Barry";
myNameValueList.age = fields.USER_AGE.value;
Actually calling the form is done via the form object using the callForm() method. This method can accept the form name to be called and the newly created name value pairs list.
When control comes back to the form the script continues. It checks the value of the response and if it is confirmed, the row is set as deleted and the save button is shown.
Enter the following code into the deleteToDo
script and save it:
// Call form to
confirm deletion
var params = {};
params.TITLE = tables.TO_DO_LIST.TITLE.value;
form.callForm("ToDoListConfirmDelete",
params);
// On return check response, if OK the delete
row and update list
if ( fields.DELETE_RESPONSE.value == true)
{
tables.TO_DO_LIST.deleteRow();
showSavePanel();
}
The form ToDoListConfirmDelete has two associated button on click scripts (confirmOk and confirmCancel) which already contain code, open them up and have a look what they are doing.
Now run the form and try and delete a few of your tasks from the list, it should all work beautifully. If not, go back and check the instructions to see if you missed anything.
If all else fails, you can import the completed solution
from Studio\samples\to_do_list\tutorial5_solution.zip
from the Verj.io Studio
installation.
Finished!
That completes this tutorial. You have seen how to use the code-assist features to access objects and their methods, written scripts that access field and table field values, looped through tables, styled controls at runtime and called forms, among other things.
If you want to enhance the application further and test what you have learnt so far, why not try to add the following functionality:
- Change the icon for the completed tasks so it isn’t a green tick
- Allow tasks to be set to incomplete from the complete state
- Add a button to show/hide the date column
- Add the ability to order the items by date