Test Server Configuration
See also: Studio Preferences, Introduction to the Verj.io Server, Deployment Overview
Test servers can be configured using the Servers tab of the Studio Preferences Dialog. Once a server has been added, it can then be used within the studio e.g. it can be deployed to, or it can be made the current server that is used to test forms and other entities and is used for debug.
Selecting the current server
The current server can be changed using the server dropdown shown in the top right-hand corner of the studio window.
![]()
This dropdown list includes: the distributed Embedded Server, all on-premise servers that have been added using the Servers tab of the Studio Preferences dialog, and all cloud Service Plans (see below). The current server is changed by selecting the appropriate server from the list – this server can then be used for testing and debugging.
In most cases the selected server and the studio should both point to the same workspace – this is a requirement when you are running test forms and other entities, and you will receive a warning message when the server and studio are using different workspaces. However when you are debugging, the studio and server may well have different workspaces – you just need to ensure that both the studio and the server have the same copy of any scripts that are being debugged.
The icon to the right of the dropdown shows the current status of the selected server: this will show either a green tick to indicate the server is running or a red cross to indicate that it can’t be contacted. Also, clicking on this icon displays a dropdown menu where you can perform actions on the selected server e.g. start, stop, show status, view logs etc.
Configuring Servers
There are three types of server that can be configured/added:
- Embedded
Server - this
server is distributed with the Verj.io Studio and is the default server
type for use with the studio. It’s a cut down instance of Apache Tomcat
and is fully integrated with the studio. Mostly this server looks after
itself and does not need to be manually started or stopped.
- Cloud
Servers – i.e. a Service Plan running in the Verj.io
cloud
- On-premise
Servers – any other instance of a Verj.io server installed
locally or on any accessible server
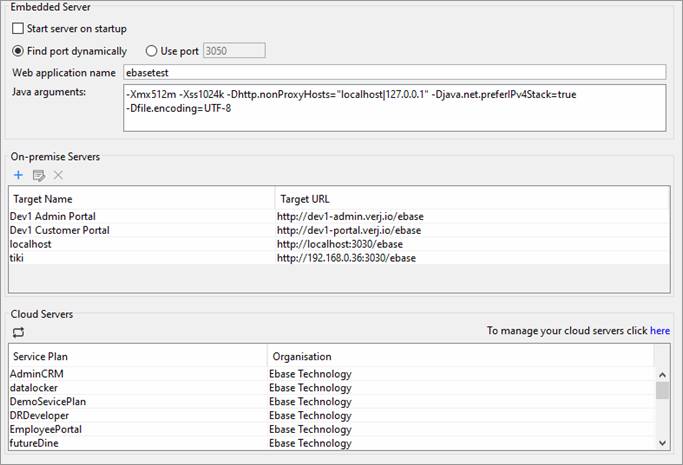
Embedded Server
The
Embedded Server is usually started automatically each time the studio is
started and closed as the studio is shut down.
Start server on startup: controls whether or not the server
is started automatically when the studio is started
Find port dynamically: if selected, the system will
dynamically find an unused port
Use port: use the explicit port number specified
Web application name: the name used to construct URLs to
test forms. This defaults to ebasetest.
If this name is changed, note that the ebasetest.xml
file and ebasetest directories in the
Embedded Server file system do not
need to be renamed – these must be named ebasetest
regardless of the web application name.
Java arguments: arguments to be added to the Java command
used to start the server
Cloud Servers
Service Plans are
shown automatically in this panel when the studio user has the required roles
(these are configured using the Verj.io Portal). See Server
Security below.
On-premise Servers
On-premise
servers can be added, deleted and edited using the toolbar at the top of this
panel.
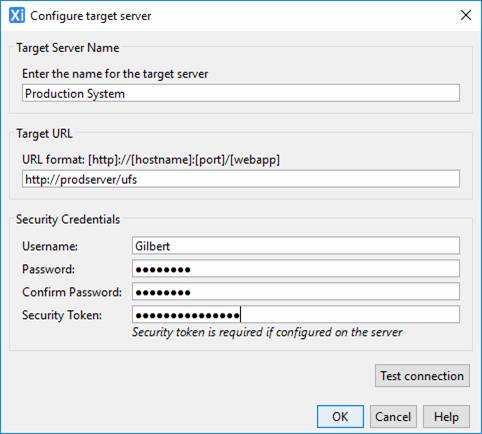
|
Target Server Name |
Enter any name of your choice; this name is shown each time you select a target server |
|
Target URL |
The URL of the target system up to and including the web application name e.g. http://testserver:3031/ebasetest |
|
Security
Credentials |
User name and password on the target server. See Server Security below. Security Token is required when server deployment property Deployment Security Token is specified, and must then match the server token value. |
Click the Test connection button to test that the configuration is correct and a connection can be made to the target server.
Server security
Embedded Server
This server is embedded into the studio and the studio user has full access to all server functions, no security is required.
Cloud Servers
(Service Plans)
Service Plans are shown automatically in the studio when the studio user has at least one of the following roles (these are configured using the Verj.io Portal):
- Owner: grants access to all functionality
- Developer: allows a studio user to connect, test and debug
- Deploy: allows a studio user to deploy (see also Configuring Deployment Target Servers)
On-Premise Servers
Each user must have a configured userid on the target system – users are created using the supplied Internal Security System (Server Admin App > Security > Internal Security System). The userid/password combination must be configured as part of the on-premise server configuration as shown above. An additional security token can be configured for extra security. One or both of the following roles are needed and must be configured for each user on the target system (note that the role names are case sensitive):
- DESIGNER: allows a studio user to connect, test and debug
- DEPLOY: allows a studio user to deploy (see also Configuring Deployment Target Servers)