Logon Service
Calling
OpenID Connect Authorisation
See also: User Authentication, Application Authentication, Roles, Authorizations and Credentials
Description
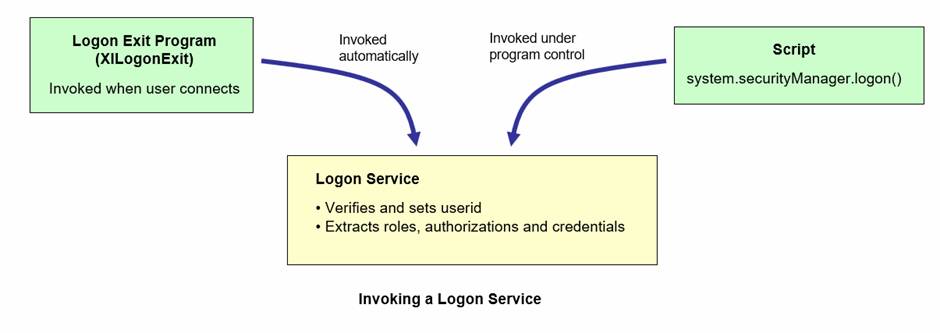
A Logon Service is a System Service (an internal web service) which is used to authenticate users. A Logon Service is responsible for checking that a user is valid (e.g. by checking a userid/password) and then setting the userid for the rest of the user’s session. Optionally, additional information – roles, authorizations and credentials – can be associated with the user, and these can be used subsequently for security checks or to perform workflow assignments.
A Logon Service can be used for any or all of the following:
· Checking userid/password combinations against a database
· Looking up a userid in an LDAP Registry (such as Active Directory)
· Obtaining user roles and authorizations
· Obtaining user credentials such as email, department, manager etc
Information about the user is supplied by the caller and is passed into the Logon Service in a Request document. This might contain a userid/password combination entered by the user, or a userid extracted from the application server (e.g. for Windows domain single sign-on), or some sort of user token extracted from the Http request (this approach is typically used by single sign-on systems), or any combination of these.
A Logon Service can be invoked automatically when a new session connects (see User Authentication) or it can be invoked programmatically at any time by an application – see Application Authentication. This is an important distinction: when the Logon Service is invoked for all new sessions, then only authenticated users will have access to the system; when the Logon Service is invoked programmatically you can control the point(s) at which authentication is required, and this makes it possible to mix authenticated and unauthenticated users in the same system.
Any number of Logon Services can be created and the specific service to be used can be specified when the Logon Service is called programmatically – this defaults to the Default Logon Service Web Service Name configured using the Server Admin App User Authentication page. When the Logon Service is called automatically when a new session connects, the Logon Service to be used (if supported) is also configured using the Server Admin App User Authentication page.
Each Logon Service is uniquely identified by a unique Web Service Name which is configured using the Logon Service Editor, and this name is used to call the service by all clients.
Each Logon Service is linked to a Logon Service Resource which defines the format of the Request and Response documents used by the service (these are described in detail below). The format of these documents is fixed and can’t be changed and therefore a Logon Service Resource is read only – it can’t be saved. When you create a new Logon Service, a new Logon Service Resource is also created at the same time and all the fields and tables from the resource have been imported into the service and mapped. All you need to do to use this service is add a script and any additional fields and tables required by the script.
A number of
Logon Services are supplied with the system in project VerjSamples
How it works
When a Logon Service is invoked, the script configured for the service’s integration event is executed. This script processes the information passed in the Request document, performs whatever processing is required, then builds a Response document that contains an authenticated userid, and optionally role, authorization and credential information for the user.
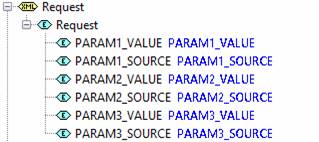
The format of the input and output documents for the service is defined in the Logon Service Resource linked to the service and cannot be changed. The input format is defined by the Request document and consists of up to three parameters where each parameter has a value and source type. This Request document represents the user’s input security parameters e.g. userid + password or some sort of token. When the Logon Service is called when a new session connects, these security credentials are extracted from the HTTP request – see Custom Authentication for a description of how this is done and the options available. When the Logon Service is called from a script, the security credentials are supplied by the script – typically these are userid and password, see Calling a Logon Service.
The format of the output is defined by the Response document, and must be populated by the script:
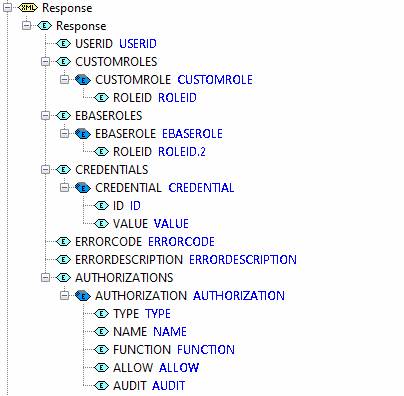
USERID: this must be set by the implementing script – failure to do this will result in an exception being thrown back to the caller. When this userid is set, the system accepts the user as successfully authenticated and the userid is used for the duration of the user’s session.
CUSTOMROLES: this is an optional table of roles that will be added to the user’s security definition.
EBASEROLES: this is another way to provide a list of roles (Historically there was a difference between CUSTOMROLES and EBASEROLES but this is no longer true)
AUTHORIZATIONS: this is an optional table of authorizations that will be added to the user’s security definition.
CREDENTIALS: this is an optional table of credentials that will be added to the user’s security definition.
ERRORCODE: set this to a value other than 00000 to indicate that the logon has failed.
ERRORDESCRIPTION: set this in conjunction with ERRORCODE to indicate the reason why the logon has been rejected.
Adding Authorizations
Authorizations are added by adding rows to the AUTHORIZATIONS table. Each authorization contains three fields that can be checked using the SecurityManager.isAuthorized() method: type, name and function. The other two fields shown below Allow/prevent and Audit are flags that influence authorization behaviour but can’t be supplied using SecurityManager.isAuthorized().
|
Type |
Can be any character string, but typically is the type of authorization being checked e.g. Customer, Account, Request etc |
|
Name |
Can be any character string, but typically represents the explicit item to be checked e.g. customer name, account id, request id etc. When an authorization is associated with a user, the name can be provided as either: · A character string · A character string ending with a masking character (*) · A list of values each one of which can end with a masking character (*) · A range of values – these can be numeric or character values |
|
Function |
Can be any character string, but typically represents the action to be checked e.g. Delete, Create, Change etc |
|
Allow/prevent |
A boolean flag that determines whether an authorization check should be allowed or prevented. This is provided when an authorization is associated with a user. |
|
Audit |
An optional boolean flag that determines whether an authorization check using this authorization should be audited. This is provided when an authorization is associated with a user. |
Here is an example of adding simple authorizations to a user. These two authorisations allow all actions against all customers except for deletions.
var auths = tables.AUTHORIZATION;
//
First authorisation allows all actions on all customers
auths.insertRow();
auths.TYPE.value = "Customer";
auths.NAME.value = "*";
auths.FUNCTION.value = "*";
auths.ALLOW.value = true;
//
Second authorisation constrains this by disallowing customer deletions
auths.insertRow();
auths.TYPE.value = "Customer";
auths.NAME.value = "*";
auths.FUNCTION.value = "Delete";
auths.ALLOW.value = false;
auths.updateTable();
The Name field can contain either a character string, a list or a range of values. Lists and ranges are configured as a JSON string:
A list is supplied as a JSON array. Note that each value can contain a masking character (*) as the last character: e.g.
var auths = tables.AUTHORIZATION;
auths.insertRow();
auths.TYPE.value = "Account";
var list1 = ["Name 1", "Name 2",
"Pfx1*"];
auths.NAME.value = JSON.stringify(list);
auths.FUNCTION.value = "Create";
auths.ALLOW.value = true;
auths.updateTable();
A range is supplied as a JSON object e.g.
var auths = tables.AUTHORIZATION;
auths.insertRow();
auths.TYPE.value = "Request";
var range = {
inclusiveMin:
1000,
inclusiveMax:
9999
};
auths.NAME.value = JSON.stringify(range);
auths.FUNCTION.value = "*";
auths.ALLOW.value = true;
auths.updateTable();
Ranges can contain either character string are numeric values. Supported attributes are:
- inclusiveMin
- inclusiveMax
- exclusiveMin
- exclusiveMax
One min and one max value should be supplied.
When more than one authorization applies to any given request e.g. a request to delete a customer in the first example above, the most specific authorization is used. The rules for how this is determined are:
1.
A
range is less specific than a character string or a list
2.
For character strings (either in a list or as a
simple string) containing a masking character (*), the character string with
the highest number of characters preceding the * is most specific. e.g. ABCD* is more specific than AB*, which in turn is more
specific than *. A value
with no masking characters is always the most specific, and a single masking
character * is always the least specific. This logic is applied first to the
authorization type, then name, then function
to determine which of any two applicable authorizations should be applied.
3.
If the authorization type, name
and function are all equal for any two authorizations being compared, an
authorization specifying prevent takes
precedence over an authorization specifying allow.
4.
If no authorization applies, the request is
denied.
5.
Some functions are implied by other functions as
follows:
|
Function |
Implies |
|
Read |
View, Export |
|
Write |
Read , View, Export, Import |
Testing
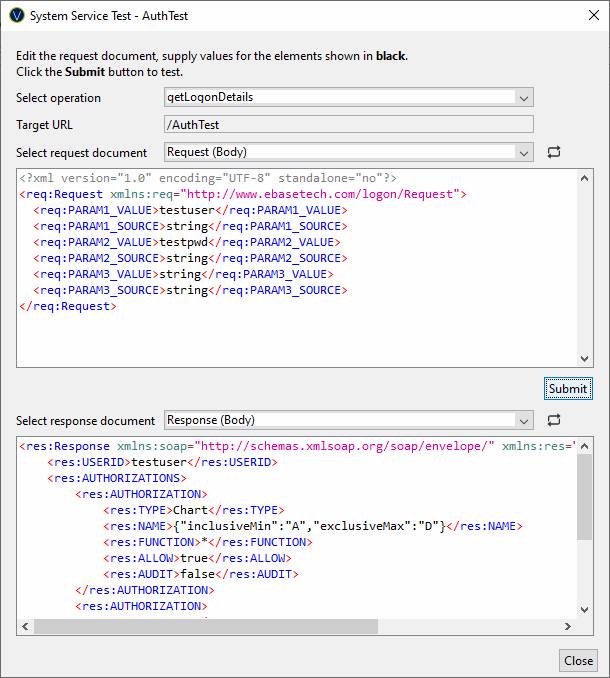
A Logon Service can be tested by clicking the test icon ![]() on the editor toolbar. The test dialog shown
below is then displayed. Fill in test values in the request document and click
the Submit button.
on the editor toolbar. The test dialog shown
below is then displayed. Fill in test values in the request document and click
the Submit button.
Supplied Examples
A number of sample Logon Services are supplied in the VerjSamples project.
Calling a Logon Service
A Logon Service can be invoked in two ways:
1. Automatically – when a user first connects
2. On demand – using system.securityManager.logon()
Users can be authenticated at any time by calling the SecurityManager.logon() method – this is only available to Javascript scripts. Use of this method makes it possible to mix authenticated and unauthenticated users in the same system, authenticating users at the point where they need to access a protected service.
The following example shows a logon function where form fields USER and PASSWORD contain the userid and password, and the parameter source type for both is arbitrarily set to “Script” (which might be checked by the Logon Service). The function returns true if the logon is successful, and generates and error message and returns false if it fails. When the Logon Service returns an error code or fails to set a userid in the response document, a LogonException is thrown and this exception contains the error code and error description returned by the Logon Service.
function logon()
{
try
{
system.securityManager.logon([
["Script", fields.USER.value],
["Script", fields.PASSWORD.value] ] );
return
true;
}
catch
(e)
{
event.owner.addErrorMessage(e.javaException.message, false);
event.owner.addErrorMessage("code:
" + e.javaException.errorCode + ",
description: " + e.javaException.errorDescription);
return
false;
}
}
The logon() method can also optionally accept the web service name of the service to be called as the first parameter e.g.
system.securityManager.logon("activeDirectoryService",
[ ["Script", fields.USER.value],
["Script", fields.PASSWORD.value] ] );
Calling OpenID Connect Authorisation
OpenID Connect can be invoked in two ways:
- Automatically – when a user first connects
2. On demand – using system.securityManager.logonOpenIdConnect()
OpenID Connect uses OAuth 2.0 authorization flow. When the logonOpenIdConnect() method is called, the user is redirected to an authorization server. The user enters their credentials into the authorization server and on success the user is returned back to the Verj.io application.
The following example shows an OpenID Connect authorize call to Google. Note that the application has to be registered to Google using the developer tools.
function logon()
{
try
{
system.securityManager.logonOpenIDConnect("Google");
return
true;
}
catch
(e)
{
event.owner.addErrorMessage(e.javaException.message, false);
event.owner.addErrorMessage("code:
" + e.javaException.errorCode + ",
description: " + e.javaException.errorDescription);
return
false;
}
}
The logonOpenIdConnect() method can also optionally accept an OpenID Scope scope as the second parameter e.g.
system.securityManager. logonOpenIDConnect("Google",
"openid profile email");